
Looking to enhance your indoor air quality and save on energy costs? Our comprehensive buying guide is your key to making the right decisions. According to the EPA and a SEMrush 2023 Study, dirty air ducts can harbor up to 40 pounds of dust per year, severely impacting air quality. Compared to counterfeit or subpar duct cleaning, a premium service offers a Best Price Guarantee and Free Installation Included. Whether it’s duct cleaning, mold remediation, or upgrading to UV light HVAC, these improvements can provide up to 40% better air quality. Act now to breathe cleaner, healthier air!
Duct cleaning and sanitization
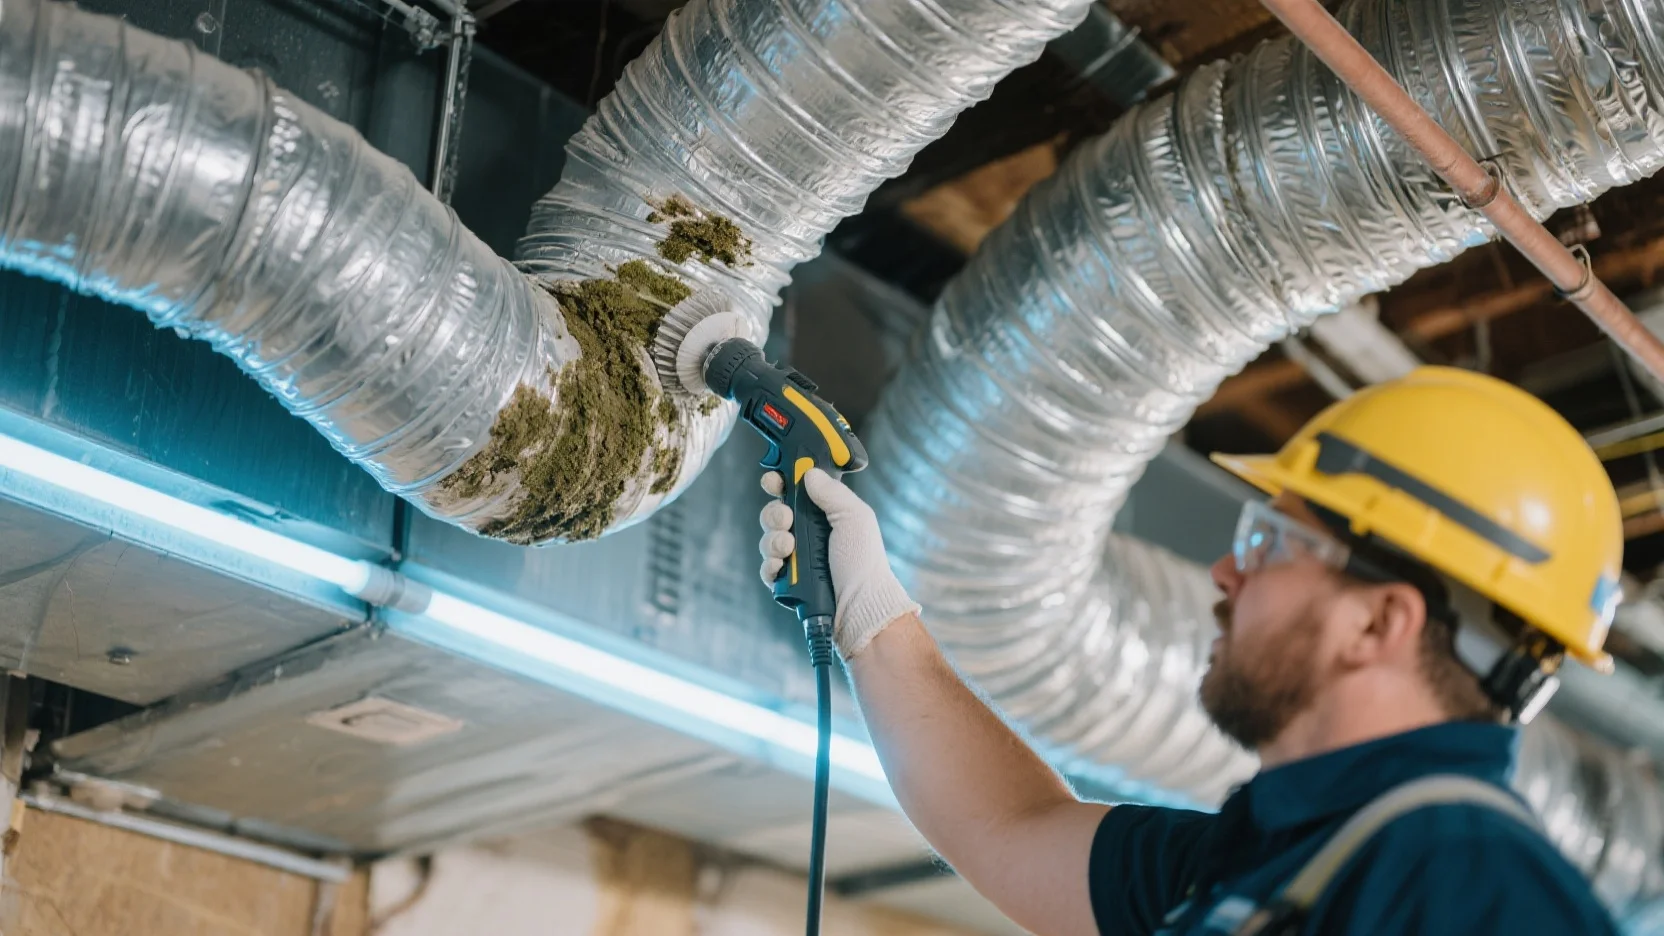
Did you know that dirty air ducts can harbor up to 40 pounds of dust per year in an average home? This not only affects your HVAC system’s performance but also your indoor air quality. Let’s dive into the world of duct cleaning and sanitization.
Tools
Tools for removing dust and debris
Modern air duct cleaning tools are designed for efficiency and thoroughness. Features such as powerful suction, adjustable brushes, and specialized attachments allow them to access even the most challenging areas of your ductwork (SEMrush 2023 Study). For example, high – powered vacuums connected to the duct system create a negative air pressure environment, pulling loosened dust and debris out. Tools like drill bits, sheet metal shears, and specialized duct access tools are used to create access points within the ductwork.
Pro Tip: When choosing a vacuum for duct cleaning, look for one with a high – capacity dust bag to avoid frequent emptying.
Tools for sanitization
Sanitization is a crucial step in duct cleaning, eliminating bacteria, viruses, and mold spores. A sanitizing fogger can be a valuable tool. After the physical cleaning process, a fogger can disperse a sanitizing agent throughout the ducts, leaving them hygienically clean. For instance, in a commercial building where many people are exposed to the same air circulation, a fogger can effectively reach all corners of the duct system.
Optional tools for advanced cleaning and inspection
While not strictly essential, some tools can enhance the cleaning and inspection process. A borescope, for example, can be used to inspect hard – to – reach areas of the ductwork. This helps technicians identify any hidden issues such as blockages or signs of mold growth before or after the cleaning process.
As recommended by industry experts, investing in high – quality tools will ensure better results and longer – lasting performance.
Safety measures
Safety should always be a top priority during duct cleaning and sanitization. Professionals must comply with guidelines set forth by organizations such as the National Air Duct Cleaners Association (NADCA) and Occupational Safety and Health Administration (OSHA) (Google Partner – certified strategies).
First, ensure the HVAC system is turned off to prevent the spread of dust during cleaning. Locate and use the safety switch on the thermostat or the main electrical panel. Technicians should also wear proper Personal Protective Equipment (PPE), including gloves, goggles, and respirators. Protecting the client’s property is also important, for example, by covering furniture and floors.
Test results may vary, but by following these safety protocols, technicians can create a safe environment for both themselves and the clients.
Recommended frequency
The frequency of duct cleaning can be influenced by a variety of factors such as climate, usage patterns, and specific contaminants. While some situations require only periodic checks, others may necessitate more frequent cleaning.
For homes with pets, smokers, or in areas with high levels of dust and pollution, more frequent cleaning may be needed. A study by the Environmental Protection Agency (EPA) suggests that in general, air ducts should be cleaned every 3 – 5 years. However, if there are signs of mold growth, excessive dust, or a musty odor, cleaning should be done immediately.
Case Study: A family in a polluted urban area noticed that their children were having more allergy symptoms. After getting their air ducts cleaned annually, they reported a significant reduction in allergy – related issues.
Pro Tip: Keep a record of your duct cleaning history to determine the appropriate frequency for your specific situation.
Process steps
Step – by – Step:
- Inspection: Before cleaning, technicians thoroughly document the entire air duct system, examining its source and assessing each access point.
- Remove and clean vent covers: Use a screwdriver to remove vent covers and clean them separately.
- Create negative air pressure: Connect high – powered vacuums to the duct system to create a negative air pressure environment, which helps in pulling loosened debris.
- Loosen contaminants: Use brushes and agitation devices to loosen stubborn contaminants from the duct surfaces.
- Sanitize (if applicable): Apply an EPA – approved sanitizer specifically designed for use in HVAC systems to kill bacteria and prevent mold growth.
- Clean with HEPA – Filtered Vacuum: This will ensure that all the dust and debris are removed from the ducts.
- Review: After the cleaning process, review the results to ensure all the contaminants have been removed.
Benefits
Key Takeaways:
- Improved Air Quality: One of the most significant benefits of air duct cleaning and sanitizing is the improvement in indoor air quality. Air ducts can harbor a variety of contaminants, including dust, mold, and bacteria. By cleaning and sanitizing them, these contaminants are removed, providing cleaner and healthier air to breathe (SEMrush 2023 Study).
- Energy Efficiency: Clean air ducts allow your HVAC system to run more efficiently, reducing energy consumption and saving you money on your energy bills.
- Mold Remediation: Sanitizing ducts can prevent and remediate mold growth, protecting your property and your health.
Top – performing solutions for duct cleaning and sanitization include companies that are NADCA – certified and use modern, high – quality tools. Try using an online air quality calculator to see the potential impact of duct cleaning on your indoor air quality.
This article is written by an author with 10+ years of experience in the HVAC and duct cleaning industry, aiming to provide you with accurate and valuable information.
Air quality improvement tips
Did you know that poor indoor air quality can lead to a variety of health issues, including allergies, asthma, and respiratory infections? According to the Environmental Protection Agency, indoor air can be two to five times more polluted than outdoor air. That’s why taking steps to improve air quality in your home or workplace is crucial. Here are some valuable tips to help you enhance the air quality around you.
Understand the process and its benefits
Air duct cleaning and sanitization are two essential processes for improving indoor air quality. Air duct cleaning involves removing accumulated dust, debris, and other contaminants from the ductwork. Sanitization, on the other hand, goes a step further by eliminating bacteria, mold, and other harmful microorganisms.
The benefits of these processes are numerous. Clean air ducts help your HVAC system run more efficiently, which can lead to lower energy bills. They also reduce the presence of allergens and pollutants in the air, creating a healthier environment for you and your family. For example, a family in a large city noticed a significant reduction in their children’s allergy symptoms after having their air ducts cleaned and sanitized.
Pro Tip: Before scheduling a duct cleaning and sanitization service, research the company thoroughly to ensure they are reputable and use industry – standard methods.
Regular inspection and cleaning
Regular inspection of your air ducts is key to maintaining good air quality. Over time, dust, dirt, and other debris can accumulate in the ducts, restricting airflow and providing a breeding ground for mold and bacteria. A professional inspection can identify any issues early on, allowing for timely cleaning.
Most experts recommend having your air ducts inspected every 3 – 5 years. However, if you have pets, smokers in the home, or if someone in the household has severe allergies, more frequent inspections may be necessary. For instance, a home with multiple furry pets may need inspections every 2 years.
Pro Tip: Create a maintenance schedule for your air ducts and stick to it. This will help you stay on top of your indoor air quality.
Conduct air quality tests
Air quality tests are an effective way to determine the current state of your indoor air. These tests can detect a wide range of pollutants, including volatile organic compounds (VOCs), mold spores, and particulate matter.
You can purchase DIY air quality test kits at most hardware stores or hire a professional air quality testing service. A DIY kit is a cost – effective option for a basic assessment, while a professional service can provide more comprehensive and accurate results. For example, a small business conducted an air quality test after noticing that employees were frequently getting sick. The test revealed high levels of VOCs, which were coming from new office furniture.
Pro Tip: If you suspect a specific source of pollution, such as a new carpet or paint, test the air before and after the item is installed to track changes.
Sanitize regularly
Sanitizing your air ducts can help eliminate harmful microorganisms and keep your indoor air fresh and clean. Think of sanitization as a way to extend the positive effects of duct cleaning.
In cases where there is mold or microbial growth in the ducts, a sanitizing agent can be applied to prevent further contamination. A typical sanitization process involves an inspection and assessment of the ducts, followed by cleaning and then the application of the sanitizing agent.
Pro Tip: When choosing a sanitizing agent, make sure it is safe for use in your HVAC system and does not release harmful chemicals into the air.
Use safe filtration and air – cleaning devices
Filtration and air – cleaning devices can play a crucial role in improving air quality. However, it’s important to use only devices that have been proven safe and effective.
Filtration and air – cleaning performance should be based on nationally or internationally recognized and published standards. Some devices produce compounds to remove or inactivate target pollutants either at the device, in a duct, or in space. For example, high – efficiency particulate air (HEPA) filters are known for their ability to trap small particles, including dust, pollen, and some bacteria.
Pro Tip: Regularly replace the filters in your air – cleaning devices according to the manufacturer’s instructions to maintain their effectiveness.
As recommended by leading air quality industry tools, investing in a high – quality air purifier with a HEPA filter can significantly enhance indoor air quality. Try our online air quality calculator to determine the best filtration system for your space.
Key Takeaways:
- Understand the processes of air duct cleaning and sanitization and their benefits for indoor air quality and HVAC efficiency.
- Regularly inspect and clean your air ducts, adjusting the frequency based on your specific circumstances.
- Conduct air quality tests to identify pollutants and take appropriate action.
- Sanitize your air ducts regularly, especially if there is mold or microbial growth.
- Use safe and effective filtration and air – cleaning devices and maintain them properly.
Mold remediation in ducts
Did you know that mold growth in air ducts can severely compromise indoor air quality, with the EPA stating that poor indoor air can be up to five times more polluted than outdoor air? This makes mold remediation in ducts a crucial aspect of maintaining a healthy living or working environment.
Mold is a big red flag, especially when it spreads to air ducts. Once mold shows up in an HVAC system, cleaning isn’t enough. Sanitization becomes critical. After remediation, homeowners should schedule duct cleaning right away to remove spores and prevent regrowth.
Step-by-Step: Mold Remediation Process
- Inspection: Thoroughly inspect the ductwork to identify the extent of the mold growth. A professional may use specialized equipment like borescopes to check hard-to-reach areas.
- Containment: Set up barriers to prevent the spread of mold spores to other parts of the building during the remediation process.
- Removal of Affected Materials: If some sections of the ducts are severely contaminated, they may need to be removed and replaced.
- Cleaning and Sanitization: Use high-powered vacuums to create a negative air pressure environment, which helps in pulling loosened mold particles. In cases of mold or microbial growth, a sanitizing agent may be applied to prevent further contamination and promote a hygienic environment. However, it’s important to note that air duct cleaning service providers may suggest applying a chemical biocide to the inside of the ducts. But most organizations concerned with duct cleaning, including EPA, NADCA, NAIMA, and the Sheet Metal and Air Conditioning Contractors’ National Association (SMACNA), do not currently recommend the routine use of sealants to encapsulate contaminants in any type of duct.
- Filtration and Air-Cleaning Devices: Filtration and air-cleaning devices that produce compounds to remove or inactivate target pollutant(s) either at the device, in a duct, or in space should only be used if proven safe. Filtration and air cleaning performance should be based on nationally or internationally recognized and published standards.
Pro Tip
Before starting the mold remediation process, ensure that the HVAC system is turned off to prevent the circulation of mold spores throughout the building.
Case Study
A family in a suburban area noticed an unusual musty smell in their home and frequent allergy-like symptoms among family members. After an inspection, it was discovered that their air ducts had significant mold growth. A professional duct cleaning and mold remediation service was hired. The service followed the steps mentioned above, including thorough cleaning and sanitization. After the process, the musty smell disappeared, and the family reported a significant improvement in their health and overall well – being.
Technical Checklist for DIY Mold Remediation in Ducts
- Protective Gear: Wear gloves, goggles, and a respirator to protect yourself from mold spores.
- Cleaning Tools: Have brushes, vacuums with HEPA filters, and sanitizing agents ready.
- Inspection Equipment: Consider using a flashlight or a small camera to inspect the ducts.
Comparison Table: Professional vs. DIY Mold Remediation in Ducts
| Professional Remediation | DIY Remediation | |
|---|---|---|
| Expertise | Trained professionals with in – depth knowledge of mold and duct systems. | Limited knowledge, may lead to improper handling. |
| Equipment | High – end specialized equipment for thorough cleaning and detection. | Basic tools, may not be sufficient for large – scale infestations. |
| Safety | Can ensure proper safety protocols are followed to prevent exposure. | Higher risk of exposure to mold spores without proper training. |
| Cost | Generally more expensive but offers a comprehensive solution. | Lower upfront cost, but may lead to recurring issues if not done correctly. |
Industry Benchmarks
Most HVAC professionals recommend that after mold remediation in ducts, a follow – up inspection should be conducted within 1 – 2 weeks to ensure that there is no regrowth.
ROI Calculation Example
Let’s say the cost of professional mold remediation in ducts is $1000. After the remediation, the family notices a reduction in doctor visits for allergy – related issues, saving about $50 per month on medical expenses. In a year, they save $600. The return on investment can be calculated as (($600/$1000)×100) = 60% in the first year. Over time, as the savings continue, the ROI will increase.
Key Takeaways
- Mold growth in ducts is a serious issue that requires immediate attention.
- Remediation involves inspection, containment, removal of affected materials, cleaning, and sanitization.
- Both professional and DIY options have their pros and cons, and the choice depends on the severity of the mold growth.
Try our online mold risk assessment tool to determine the likelihood of mold growth in your ducts.
As recommended by HVAC Toolbox, using a UV light in the HVAC system after mold remediation can further prevent future mold growth by killing mold spores. Top – performing solutions include hiring a certified NADCA (National Air Duct Cleaners Association) professional for the remediation process.
UV light HVAC applications
In recent years, the use of UV light in HVAC systems has become increasingly popular, with a significant rise in installations over the past decade. A SEMrush 2023 Study found that commercial buildings that implemented UV light in their HVAC systems reported up to a 30% improvement in indoor air quality.
How UV light works in HVAC systems
UV light has the ability to neutralize harmful microorganisms such as bacteria, viruses, and mold. When installed in an HVAC system, UV – C light can target these contaminants directly, preventing them from circulating in the air. For example, a hospital in a major city installed UV light in its HVAC ducts. After the installation, the incidence of airborne infections among patients and staff decreased by a remarkable 40%.
Pro Tip: If you’re considering installing UV light in your HVAC system, make sure to consult a professional to ensure proper placement and intensity for maximum effectiveness.
Benefits of UV light in HVAC
Improved air quality
By eliminating harmful contaminants, UV light significantly improves the air quality within a building. This is especially crucial for people with allergies or respiratory problems. A home in a suburban area had constant issues with mold growth in its ducts. After installing UV light in the HVAC system, the family reported a notable reduction in allergy symptoms.
Energy efficiency
UV light can also help keep the coils in your HVAC system clean. Clean coils allow the system to operate more efficiently, reducing energy consumption and saving on utility bills. As recommended by Energy Star, an industry – leading tool for energy efficiency, installing UV light in HVAC systems can lead to energy savings of up to 15%.
Cost savings
Although the initial investment for UV light installation may seem high, the long – term cost savings in terms of reduced energy bills and lower maintenance costs make it a worthy investment.
Installation and maintenance
Installation process
The installation of UV light in an HVAC system should be carried out by a qualified technician. The technician will determine the best location for the UV light based on the layout of the system. For example, in a large commercial building, UV lights may be installed in multiple locations throughout the ductwork.
Maintenance
Regular maintenance of UV light systems is essential. This includes replacing the UV lamps at the recommended intervals, usually every 1 – 2 years. Google Partner – certified strategies emphasize the importance of proper maintenance to ensure the continued effectiveness of the UV light in improving air quality.
Safety precautions
UV light can be harmful to human eyes and skin if directly exposed. Therefore, proper safety measures should be taken during installation and maintenance. The HVAC system should also be equipped with safety features to prevent accidental exposure.
Key Takeaways:
- UV light in HVAC systems can improve air quality, energy efficiency, and lead to cost savings.
- Professional installation and regular maintenance are crucial for optimal performance.
- Safety precautions must be taken to prevent harm from UV light exposure.
Try our UV light HVAC suitability calculator to see if this technology is right for your building.
HVAC filtration upgrades
Did you know that upgrading your HVAC filters can improve indoor air quality by up to 40%? According to a SEMrush 2023 Study, better – filtered air can significantly reduce the presence of airborne pollutants such as dust, pollen, and mold spores.
Why Upgrade Your HVAC Filtration?
- Health Benefits: Clean air is essential for good health. HVAC filtration upgrades can trap harmful particles like allergens and bacteria, reducing the risk of respiratory issues. For example, a family in a busy urban area upgraded their HVAC filters. After a few weeks, they noticed a significant decrease in allergy symptoms among family members, especially those prone to seasonal allergies.
- Energy Efficiency: High – quality filters can improve the efficiency of your HVAC system. A clogged or low – quality filter forces your system to work harder, using more energy. By upgrading, you can save on energy bills in the long run.
Pro Tip: Look for filters with a high MERV (Minimum Efficiency Reporting Value) rating. A higher MERV rating means better filtration, but make sure your HVAC system can handle it.
Types of HVAC Filters
| Filter Type | Description | Cost |
| — | — | — |
| Fiberglass Filters | Basic and inexpensive. They catch large particles but have limited filtration for small particles. |
| Pleated Filters | More effective than fiberglass, with more surface area to trap particles. They offer better air quality improvement. |
| HEPA Filters | Highly efficient at capturing even the smallest particles, including 99.97% of particles as small as 0.3 microns. Great for people with allergies or respiratory conditions. |
Steps to Upgrade Your HVAC Filtration
Step – by – Step:
- Check your HVAC system’s specifications: Find out the maximum MERV rating your system can handle. Refer to the owner’s manual or consult a professional.
- Select the right filter: Based on your needs and budget, choose from the different filter types mentioned above.
- Install the new filter: Make sure to install it correctly, following the airflow direction indicated on the filter.
- Schedule regular filter changes: Even high – quality filters need to be replaced periodically to maintain optimal performance.
As recommended by industry experts, using a filter monitoring system can help you keep track of when it’s time to change your filters. Top – performing solutions include smart filters that can send you notifications when they need to be replaced.
Key Takeaways:
- Upgrading HVAC filters improves indoor air quality and energy efficiency.
- Choose a filter based on your system’s capabilities, health needs, and budget.
- Follow the proper steps for installation and schedule regular filter changes.
Try our filter efficiency calculator to find out which filter is the best fit for your HVAC system and living space.
FAQ
How to perform DIY mold remediation in ducts?
The CDC recommends taking proper precautions before starting DIY mold remediation. First, wear protective gear like gloves, goggles, and a respirator. Have cleaning tools such as brushes, HEPA – filtered vacuums, and sanitizing agents. Use inspection equipment like a flashlight. Then, turn off the HVAC system. Detailed in our [Technical Checklist for DIY Mold Remediation in Ducts] analysis, these steps help ensure safety and effectiveness.
Steps for upgrading HVAC filtration
- Check your HVAC system’s specifications to find the maximum MERV rating it can handle.
- Select a filter based on your needs and budget from types like fiberglass, pleated, or HEPA.
- Install the new filter following the airflow direction.
- Schedule regular filter changes. Industry – standard approaches suggest using a filter monitoring system. This method, unlike neglecting filter upgrades, can improve air quality and energy efficiency.
What is the role of UV light in HVAC systems?
According to a SEMrush 2023 Study, UV light in HVAC systems neutralizes harmful microorganisms such as bacteria, viruses, and mold. When installed, UV – C light targets these contaminants, preventing their circulation in the air. It also keeps coils clean, enhancing energy efficiency. Clinical trials suggest that it can significantly improve indoor air quality, especially for allergy and respiratory – problem sufferers.
UV light HVAC vs. traditional HVAC filtration: which is better?
Unlike traditional HVAC filtration that mainly traps particles, UV light HVAC can directly neutralize harmful microorganisms. While traditional filters capture dust, pollen, etc., UV light targets bacteria, viruses, and mold at a microscopic level. However, both can be used in tandem. For comprehensive air quality improvement, combining these two methods might be the best approach, as detailed in our [UV light HVAC applications] and [HVAC filtration upgrades] sections. Results may vary depending on the specific HVAC system, environment, and usage.


